BOM Tool
The TrustedParts.com BOM Tool allows you to retrieve pricing and inventory availability for up to 100 part numbers using one simple search. For more features, including saving your BOMs and setting default distributors, sign in or register for a free account.
To submit searches of up to 1,000 parts at a time, please see the header Extended BOM.
Start a New BOM
Add Part Numbers Line by Line
Click the Add parts line by line button. See Manage Your BOMs for how to use the tool from there.
Upload a File (Supported formats: CSV, TSV, Excel)
Upload a file by dragging it to the field provided or selecting it from a list. After your file is uploaded, follow these steps:
- If required, map the fields of the file to the BOM by dragging the applicable column header tags (from the Available Fields group) up to the corresponding field provided. For example, drag the Part Number tag up to the part number field.
- Click the button Import the BOM.
See the heading Manage Your BOMs.
Manage Your BOMs
After creating a BOM, you can name it, add more part numbers, edit and sort the part numbers, and edit and sort the list of authorized distributors.
Name Your BOM
Click on "Untitled BOM" to activate the field and assign your BOM a custom name.
Add Part Numbers
- In the Part Number column click the "+" button, then type or paste the part number in the Enter Part Number field.
- If applicable, edit the part's internal reference number. Note: This field is immediately below the manufacturer part number and is visible only when a BOM is created from an upload file and internal part numbers were supplied during the upload.
- Add the desired quantity in the Qty column. Note: Adjusting this value may affect the quantity of results previously selected for purchase (see the heading Select Results for Purchase).
- Some parts may require you to choose a specific manufacturer. If so, you may choose from the Select a Manufacturer drop-down menu in the Manufacturer column.
- As needed, repeat the above steps with additional part numbers.
Edit and Sort the List of Part Numbers
- Sort the order of part numbers by clicking the Sort By drop-down menu in the table header, or by clicking and dragging a part in the Part Number column.
- Filter by a specific part number or prefix by entering one in the Filter part number text box.
- If a part line requires you to select a specific manufacturer, choose one from the Select a Manufacturer drop-down menu in the Manufacturer column.
- Filter by a specific manufacturer name or prefix by entering one in the Filter manufacturers text box.
- Remove parts that do not exist or should otherwise be excluded from the BOM by clicking the "-" button in the Part Number column.
Lifecycle Risk
You can evaluate potential life cycle risks for part numbers you’ve added to your BOM with the following level-rating system:
- Low
- TrustedParts.com distributors indicate that this product is active.
- Low-Med
- TrustedParts.com distributors indicate that this product may be special order or is not recommended for new designs.
- Med
- TrustedParts.com distributors indicate that this product may be end of life or is not recommended for new designs.
- High
- TrustedParts.com distributors indicate that this product is end of life.
Supply Chain Risk
You can evaluate potential supply chain risks for part numbers you’ve added to your BOM with the following level-rating system:
- Low
- Product has available stock with short lead times.
- Low-Med
- Product has limited available stock or long lead times.
- Med
- Product is out of stock with short lead times.
- High
- Product is out of stock with long lead times.
Edit and Sort the List of Authorized Distributors
- Delete a distributor's results by clicking the "-" button next to that distributor name.
- Sort the order of distributor columns by clicking and dragging the column.
- Click the Add or Remove Distributor button to do the following:
- Add distributors to the Selected Distributors list by clicking the "+" button.
- Remove distributors from the Selected Distributors list by clicking the "-" button.
- Sort the order of displayed results by clicking and dragging distributor columns.
- Sort available distributors by BOM coverage.
- Order the BOM coverage of distributors from greatest to least by clicking the Sort by % Coverage button.
Export the BOM to an Excel File
- Click the gearbox icon next to the Export button at the top of the BOM to open the Edit Export Fields pop-up.
- Select the fields you want to appear on your exported file.
- Sort the order of the fields by clicking and dragging the selections to the desired positions.
- The Part Number, Quantity, and Manufacturer fields are all pre-selected and will automatically be included on the export. If you uploaded values for Internal Reference Number, that field will also be included.
- If you have signed up for an account, your custom settings will apply to all of your BOMs on all devices. If you do not have an account, the custom settings will apply anytime you use the same device and web browser.
- Press the Export button at the top of the BOM to export an Excel file.
Additional Features
- Click the "i" icon in the Part Number column to access the following:
- Part image
- Link to the datasheet
- Link to the TrustedParts.com part detail page
- Click the bell icon* in the Part Number column to open the Stock and Price Alerts form.
- Check the box Hide Parts Not Available to quickly hide all parts where our distributors do not have any inventory..
- Click Show All Price Breaks to view all price breaks. (By default, the BOM tool will only show the price break for the quantity you enter.)
- Click See More* to view different packaging options (or other variations) available for that part.
*This feature is not available for all parts.
BOM Alerts
The BOM Alerts feature allows you to receive email updates regarding changes to products in your BOM. You can receive alerts for the following changes:
- A product becomes in-stock
- A product becomes out of stock
- The stock quantity of a product exceeds the purchase quantity
- The stock quantity of a product falls below the purchase quantity
- Lifecycle Risk status changes for a product
- Supply Chain Risk status changes for a product
Enable BOM Alerts
- Click the Alerts button at the top of the BOM page to open the Alerts pop-up box.
- Select the types of alerts you wish to receive by checking the boxes. Turn off a BOM alert by unchecking a selected box or boxes.
- Choose from the Frequency of Emails dropdown to set how often you’d like to receive updates. You may choose between daily or weekly updates.
- Click the Save button to update your preferences.
Keep in mind, you will only receive a BOM Alert email when one of the selected BOM Alert changes occur to a product on your BOM, and the selected email frequency time has elapsed. If there are no applicable changes to your BOM or if the specified amount of time has not passed, you will not receive an email.
BOM Shopping Cart
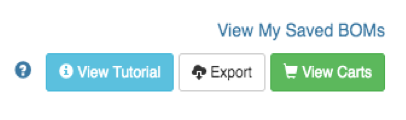
The BOM Shopping Cart feature lets you quickly transfer your BOM’s line items to select distributor web sites for purchase or quote. In-stock results display a shopping cart or a check-mark icon. To place in-stock items in your cart, select the icons:

After selecting the parts, click the View Carts button:
This opens the Selected Items pop-up.
The Selected Items Pop-Up
This pop-up displays a list of the results you have selected for purchase. Here you can adjust the quantity of parts and quickly access the authorized distributor's web site.
Click the distributor heading to collapse or expand a distributor's results:

- Adjust the part quantity for that distributor by clicking the edit icon. Note: Changing this quantity does not affect the original BOM quantity entered.
- De-select a result by clicking the delete icon.
- Parts selected using the shopping cart icon
 display a “Buy from…” button and are eligible to transfer to the distributor’s site for purchase or quote. Clicking the “Buy from…” button opens the distributor’s web site in a new browser tab and transfers these items to their shopping cart or another tool on their web site.
 - Using the check-mark icon
 to select multiple parts from a distributor displays a “Visit…” button. Clicking the “Visit…” button takes you to their site, but won’t transfer these items.
Share Your BOMs
BOMs that you own (created) can be shared with other users. Conversely, other BOM owners can share their BOMs with you.
To Share a Single BOM
- From the BOM tool, select the Share button that appears at the top of the BOM. This opens the Share BOM pop-up.
To Share Multiple BOMs
From the Saved BOMs tab of the My Account page:
- Select the BOMs from the list by checking the corresponding boxes in the Name column.
- Press the Share button. This opens the Share BOM pop-up.
The Share BOM Pop-Up
On the Share BOM pop-up, you can copy a sharable link, or share the BOM with other users. You may also view, add, and delete BOM recipients and change user permissions.
To Create a Sharable Link:
- Click CREATE A SHARABLE LINK to create a unique URL that can be copied and sent to another user.
- Click Copy Link to copy to your clipboard.
Note: BOMs shared with a link are view-only and cannot be edited by the recipient.
To Share a BOM with Other Users:
- Type or paste an email address in the Enter email addresses... field. Please note:
- Additional email addresses may be entered one at a time.
- By default, email recipients will be given editing rights (Can edit). To give just view rights, use the dropdown to select Can view.
- If a recipient does not have an TrustedParts.com account, they will need to create one.
- Click Send.
To Manage Shared BOMs
To manage a BOM already shared, access the Share BOM pop-up by selecting the [person] icon of the shared BOM.
To Add More Users: Enter another email address in the Enter Email Addresses field. Click Send.
To Change Editing Rights: For either new or current users, select Can Edit or Can View from the drop-down.
To Delete User Access: Click the
 icon in the email address line.
Additional Notes
- If a shared BOM recipient is not yet registered with TrustedParts.com, they will be invited to sign up.
- On the Saved BOMs tab of the My Account page, shared BOMs are indicated by the
 icon after the owner's name.
 - Example:

- Example:
- On the BOM tool, the shared BOM icon appears before the BOM title.
- Example:

- Example:
- Clicking the icon opens the Share BOM pop-up.
- Only one user at a time can edit a shared BOM. While a user is editing a shared BOM, other users will have view rights. About 5 minutes after the editor finishes (by navigating away from the BOM or signing out of TrustedParts.com) another user may begin editing.
Extended BOM
By default, the TrustedParts.com BOM Tool has a 100-part limit on searches. However, if you need to perform larger searches, you can request access to the Extended BOM. This feature allows approved users to submit searches of up to 1,000 parts at a time when using the BOM Tool.
To Request Extended BOM Access from TrustedParts.com
Here's how to request access to the TrustedParts.com Extended BOM:
If you do not have a user account:
- Register for a new account and verify your email address.
- Follow the instructions below for those who already have a user account.
If you have a user account:
- Sign in to your account. This takes you to the My Account page.
- Select the Additional Features tab.
- Under Features You May Request, click the Extended BOM link.
- Fill out and submit the request form.
An administrator will review your request and contact you regarding approval.
After Extended BOM Access Has Been Approved
- Sign in to your account.
- Click on the link BOM Tool in the website header. This takes you to the Start A New BOM page.
- Start your new BOM by adding parts line-by-line, or uploading a file.